How to apply the Main Mapping Techniques for Plasma Fibroblast
New to Plasma Fibroblast treatments?
Using the correct Plasma Fibroblast techniques
We know that when the
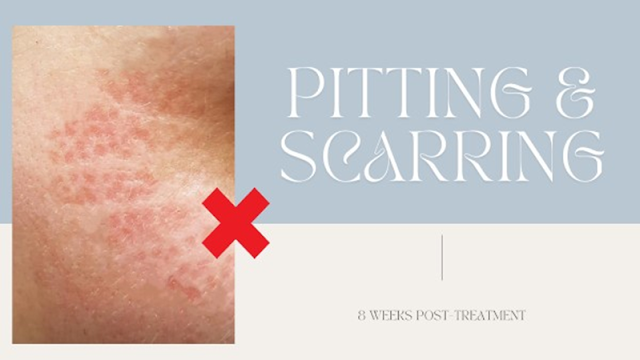
Plasma Fibroblast arc is on a higher frequency and held too long, it can cause a possible negative outcome, e.g. pitting, scarring,
infections, and possible changes in the colour of the skin.
The cost to fix or
redo the resulting problem is usually much higher than it would have been if
you performed the procedure the correct way and informed and prepared your
client from the start of the pre and aftercare.
Your name out there
is much more worth than making a quick buck.
During treatment
Complications
Complications like intents skin or negative effects will be caused as a result of using an improper device or using the device either on a higher setting, prolonged duration of the arc applied or failure by the client in complying with the pre or aftercare guidelines, it is crucial for therapists to inform their clients of the potential risks, benefits, pre-care requirements, aftercare instructions, and realistic expectations associated with plasma fibroblast therapy.
Establishing Power Settings Power settings can be adjusted based on
various factors, including the device, and treatment area, It’s essential to
start with lower power settings and gradually increase as you get more experience. Go easy on the time that you hold the
arc on the skin. Use the appropriate lower power level of the device; rather do
2 or more treatments 3 months apart, always be safe. Never exceed 2
seconds at a time, less is more.
Best
practice
As an alternative to
treating large areas in one session, suggest to your client that the treatment
to be done in phases, because for larger areas the trauma for the client is
far more severe, and recovery takes much longer.
Dots to be placed closer or farther apart?
If too close, you
risk the plasma points merging and forming a solid scab during the healing process. This
can take longer to heal and the trauma for healing is much more severe than applying
smaller isolated dots.
Points closer
together will mean a more intense overall treatment and if too far apart the treatment may not be as effective.
Image 1 & 2 correct method using 5 dot method together with spray inside deeper lines and avoiding working inside some superficial wrinkles. Image 3 Incorrect method.
Spray Method
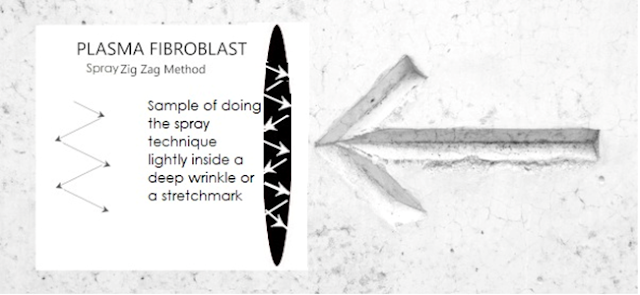
The spray method is an advanced technique and should be reserved for deep lines, stretch marks, scars, growth, hyperpigmentation removal, etc.
Please note: you have more control over the pattern and depth of work with the dot method. As for wrinkles most of the time you will treat them outside the wrinkles, but some deeper line impressions can’t be softened by treating only on the outside and are best treated on the inside hitting the base with a light spray effect and in some cases the sidewalls.
Some lines are best treated both from the inside and the outside for optimum results. The key to this technique is the ability to properly identify these types of impression lines/wrinkles.
Rather stay away from the spray technique if you are new to the technique until you have more experience.
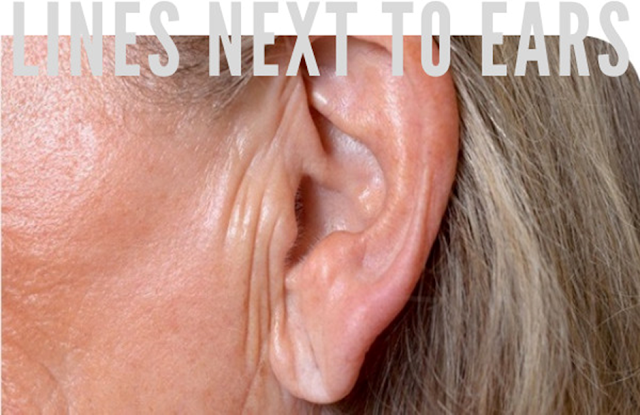
Exsample of mapping (Lines next to ears) extraction out of book 6)
LINES NEXT TO EARS
As the years go by, some of us might notice the appearance of wrinkles in the ears. They usually appear on the areas where the face joins the ears, so the skin pit by the ear plus the tragus, which is the small, pointed area of the cartilage in the middle front of the ear.
Lines and wrinkles will also appear on the skin above and below the tragus. The wrinkles usually show up as irregular vertical lines in this area, at the edge of the face near the ear. These ear wrinkles are often genetic and a natural part of aging and from sun damage.
POSSIBLE TREATMENTS
They can be eradicated by facelifts, and other cosmetic procedures such as injectables Juvéderm, or for longer-lasting results fat injections with the patient’s fat, Plasma Fibroblast also worked well with these creases.
PLASMA - FIBROBLAST Yes or No
YES→ Depending on the deepness of folds client might need several treatments.
• 1st, apply spot mode around all visible lines before swelling sets in (when wrinkles “lines” are no longer visible). Keep the dots close rather than farther apart to mimic almost the spray technique, do 2 – 3 rows. “Stretch the skin open to work as close to the crease as possible applying the dots, but never dot inside the creases!
• 2nd do 4 -5 rows 5 dot technique (dots further apart)
• 3rd Apply, only If you are comfortable using the spray technique in the deeper lines, you can stretch the lines open with your two forefingers and do the quick light zig-zag spray in the creases.
Tips
BEFORE TREATMENT
Ask the client to use hydroquinone for 3 – 4 weeks before treatment, especially for dark-skinned clients, and treat them safely without any pigmentation issues!
DURING TREATMENT
Do a minimum 2 – 3 rows of “close dots” around each wrinkle to get a better outcome and never work in a wrinkle!
HEALING
Healing period normally: 5 - 7 days. Inform your client of the following: some people will need 2-3 treatments 12 weeks apart for ideal results, initially, swelling could occur, and post-care is VERY important.
Please note! if there is a diagonal crease on the earlobe it’s a possible condition, known as Frank’s sign, which was found to have a relationship to the risk of stroke, so if your client has this, please advise them to visit their doctor to get this checked out for a precaution.
Frank sign
4 Main Basic Mappings to use for Plasma Fibroblast
5 Dot dice method
Areas
you could treat with this method:
All flat skin
surfaces: Flabby arms, Face, Eye area and Brows, Cheeks, Dark circles under
eyes, Droopy eyelids, Heavy eyelids, Jowls, Neck, Décolleté, and Tummy.
→ Start placing your
dots as per figure 1 following the numbers starting from nr 1 to place your
dots and ending with nr 5 NB! (Never dot inside an expression line).
Figure 1: ROSASS
5-Dot dice Method
Spray method
Areas
you could treat with this method:
Eyes, Deep
Expression lines, Age Liver spots, Sun Brown spots, Hypertrophic scars, Moles,
Lesions, Skin tags, Cherry angiomas, Freckles, Milia, Sebaceous hyperplasia,
Rhinophyma folds, and inside of deep lines and Stretch marks.
→ Use a Zig Zag hand
movement to lightly spray the area of concern as per Figure 2. (If bigger area,
work in sections).
Combo method
Areas
you could treat with this method:
Use around the border of
Expression lines, Atrophic scars, Boxcar scars, rolling scar Crow's foot, Frown
lines, Lines in front of ears, Lip lines, Marionette lines, Nasolabial folds,
and Necklines.
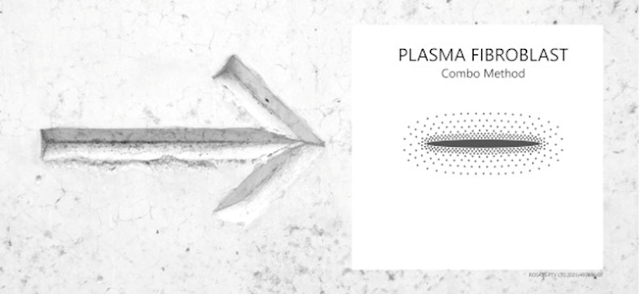
→ Start placing your
dots as per Figure 3 working around the border of concern e.g., wrinkle line or
atrophic scars, work along lines by placing dots around them 2 to 3 rows, keep
the dots close rather than farther apart, then you could start to fan out your
dots a bit further apart from each other. NB! (Never dot inside an expression
line).
Figure 3: ROSASS
combo Method
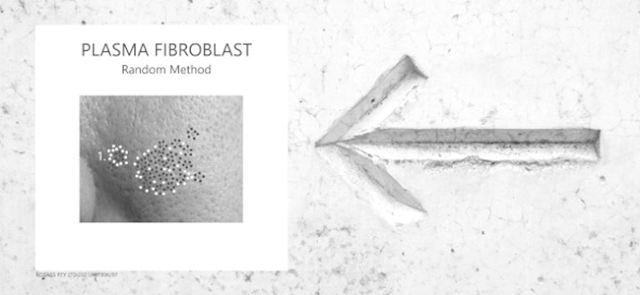
Random method
Areas
you could treat with this method:
Any area where big
pores are present, Nose, Chin, Rhinophyma, Spider veins, and inside stretch marks.
→ As per Figure 4, start placing your dots randomly around each pore as per nr 1.
NB! (Avoid working inside the pores where and if possible) “Use magnifying
glasses for this.”
Figure 4: ROSASS random Method
All Mapping
If you need mapping for all specific areas on the face or body, as per the previous under-the-ear mapping example, with step-by-step instructions (what to do and not to do) you can find it in the complete training manual Book 6 for the following areas covered:
Skin Tissue Abnormalities: Topics covered: - Sebaceous - Milia - Seborrheic keratoses - Freckles - Sun, Age, spots – Acne spots – - Big pores - Growth tissue defects: Topics covered: Warts - Skin tags – Cherry angiomas - Dermatosis papulosa nigra (DPN) - Moles - Lesions /Growths, Scars:- Topics covered: Atrophic - Ice-pick scar - Boxcar scar - Rolling scar - Rhinophyma - Hypertrophic scars - Keloid scars - Stretch marks - Self-harm - Xanthelasma - Spider veins, Cosmetic concerns, Topics covered: Forehead lines - Cheek lines - Lines next to ears - Lip lines - Nasolabial folds - Marionette lines - Chin - Jowls - Full Face - Neck lift - Décolleté - Aging hands - Arms - Knees - Tummy tightening, Eyes Topics covered: Brows - Upper eyes - Droopy eyelid - Heavy eyelid Fat banks - Crow’s foot - Under eyes - Eye Combo - Bags under eyes - Dark Circles. (PIH) Topics covered: All pigmentation issues.Expand your knowledge
Now that you have a taste of these essential mapping techniques, and need more in-depth knowledge, why not continue your learning journey with my “Plasma Fibroblast Complete Series book 6.” This 295-page manual covers over 90 Plasma Fibroblast topics, providing you with EVERYTHING you need to know to perform Plasma Fibroblast treatments confidently and effectively.Scarring
Scarring (indents/pitting) complications like intended or negative effects could be caused as a result of using an improper device, incorrect device setting, touching the skin with the needle, and prolonged duration of the arc applied by the therapist or failure by the client in complying with the pre or aftercare guidelines.
It might take anywhere from three months to two years for these scars to fade and return to their previous state. See possible remedies and remedies in the complete Book for PIH
Detailed worksheets
This
is the first in-depth book (with actual real before and after pictures) covering all topics of Plasma
Fibroblast.
I have
created this worksheet book to help you every step of the way, whether you just
starting out, or just lack some advanced knowledge in performing Plasma
Fibroblast treatments.
I regularly
hear spectacular stories from my clients about Plasma Fibroblast treatments
that went wrong performed by inexperienced therapists who only received a short
basic training (and can't afford the elaborated expensive advanced training out
there)
I want you as
a therapist to understand the importance of affordable, easy-to-come-by
knowledge so that you can maximize your chance of a safe and successful journey
in offering these amazing treatments.
The message
is simple: When a therapist does not have all the knowledge and training, the
results and experience can be highly disappointing for yourself and the client.
The most reliable outcomes and highest degrees of satisfaction happen when
clients are in the hands of a therapist who has sufficient training and all
the knowledge required in this field. (I have done all the work for you)
Please
take note, this book is for already trained Plasma
Fibroblast Technicians looking for more in-depth training!
ROSASS
strongly advises each of you to research your local legislation and/or
governing boards. It is your sole responsibility to check and clarify all rules
and regulations pertaining to your country, state, city, and county if you are
planning to perform Plasma Fibroblast treatments.
My promise to you is that if you follow our detailed worksheets and practice! practice! You should have no excuse for giving the best treatments and support to your clients and becoming a huge success in doing Plasma Fibroblast treatments, and as a BONUS you will have happy returning clients!
To see an overview of the book visit the following link: https://youtu.be/hcOO9_qjZ_4
Join me on this journey to a better skin, or to become a better technician, or both!
Thank you for subscribing! As a token of my appreciation, here’s a free e-book on how to slow down the skin’s aging process. As a bonus, discover everything you need to know as a CLIENT about Plasma Fibroblast treatments (all in one book) if you're considering this amazing treatment!
FREE e-book: 1. Subscribe to my Blog here 2. Click this link to download your FREE e-book
📘 Plasma Fibroblast Technicians “Want the full protocol and step-by-step training”? Get the ROSASS Plasma Fibroblast Manual — the most in-depth guide in the world: 👉 Gumroad (instant download) discount coupon👉 Etsy: e-Book Current on Promotion
💻 Learn more on my YouTube channel
ツ SOCIAL MEDIA HANDLES - FB: Master Plasma Fibroblast group
- FB: Clients Plasma Fibroblast treatments
- Instagram
- E-mail: rosassbeauty@outlook.com
Keep on Glowing!
Susan Mouton ROSASS ❤
#plasmafibroblast #rosassplasma #fibroblastresults
- FB: Master Plasma Fibroblast group
- FB: Clients Plasma Fibroblast treatments
- E-mail: rosassbeauty@outlook.com
Keep on Glowing!
Susan Mouton ROSASS ❤
